As we learned on the Introduction to notes page, music is comprised of a sequence of 12 notes that repeat as many times as your instrument can manage. Think about a standard piano keyboard with 88 keys. These aren’t all different notes, rather the 12 note sequence has been repeated 7 1/3 times. The guitar isn’t mapped out as visually as the piano (with its symmetric pattern of white and black keys), but we still follow the same sequence of twelve notes.
On a guitar, the more frets you have allow you to play more notes of the sequence. All guitars have at least 12 frets, so we know that they can hold at least one octave worth of music. A standard 22 fret neck goes 10 notes higher in the sequence.
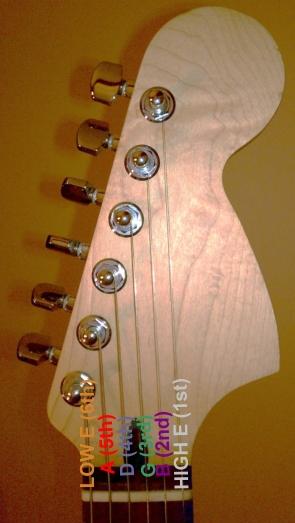
Do you remember the string names from the Using a Digital Tunerpage?
“Eddie Ate Dynamite Good Bye, Eddie!”
(6th) (5th)(4th) (3rd) (2nd)(1st)
(LOW/thick strings) (HIGH/thin strings)
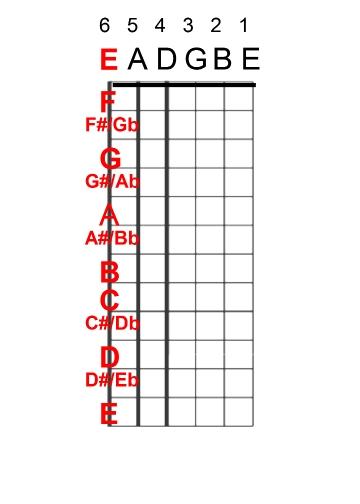
Let’s try to figure out the notes up the Low E (6th) string. We start on that note and count through the next note in the chromatic sequence. You can use this chart as a reference:
—————UP————->
A
A#/Bb
B
C
C#/Db
D
D#/Eb
E
F
F#/Gb
G
G#/Ab
Starting here and counting “up” >
*Remember- it doesn’t matter where you start in the sequence. Just keep counting from one note to the next. (When you get to G#/Ab, the sequence starts over again on A).
If we count up (going L to R in the sequence)from the letter E, we get:
E F F#/Gb G G#/Ab A A#/Bb B C C#/Db D D#/Eb E
Here is how it would look on the guitar:
*You can find the rest of the notes on the Low E string by simply continuing the sequence until you run out of frets. You can fill in this chart using the same method that we used for the Low E string. Simply find the open string letter and count up the sequence from there. You will know you did it right if the 12th fret (the double dot) reads EADGBE again. We know there are only twelve notes in music, so wherever you start on a string, you can count up 12 frets and be on the octave of the same note you started on. (We don’t count the number we start on-that’s why you don’t end up with 13).
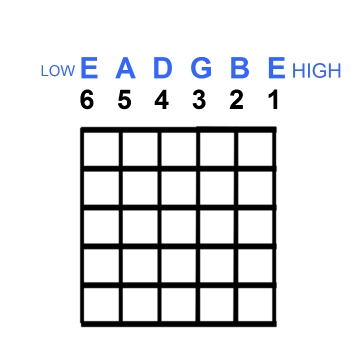
There are several ways to notate musical examples for the guitar. Standard Notation, Tablature (TAB) and Chord/Scale charts are the most common.
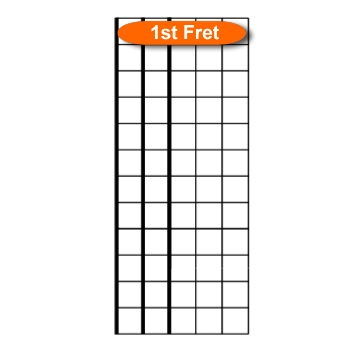
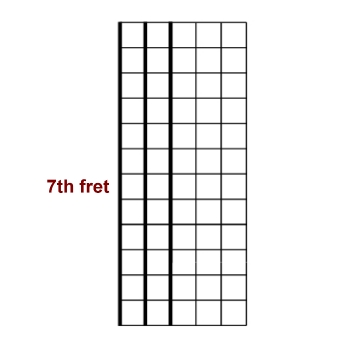
Chord and Scale charts are actually pretty simple once you understand the orientation.
The 6 vertical lines represent each string. The horizontal lines represent each fret.
The example above shows five frets of the guitar neck,
but chord/scale charts can contain as many frets as needed.
***Always assume the 1st space is the 1st fret…
…unless you see a fret number indicating a specific fret.
*If a fret number is specified, use the pattern based on that fret!
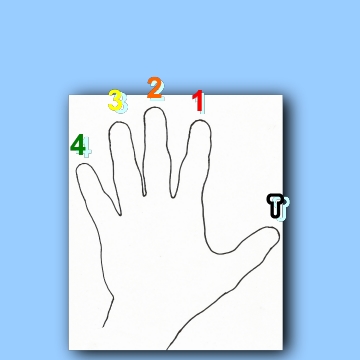
Now that you understand the orientation of the neck graphic, we need to number our fretting fingers…
(*it’s not uncommon to use your fretting thumb (T) to produce chords.)
Make sure you understand that:
1st finger=index finger
2nd finger=middle finger
3rd finger=ring finger
4th finger=pinky
T=thumb
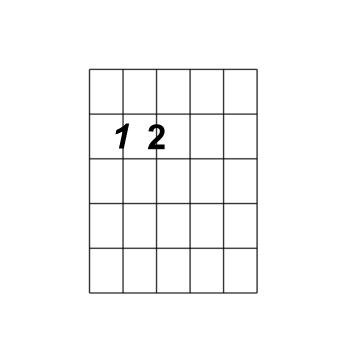
CHORD CHARTS
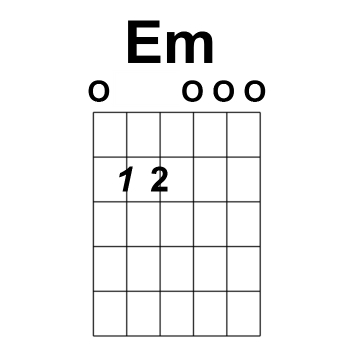
*By putting finger numbers on the chord/scale charts, we can create pictorial diagrams of a given chord.
To play this example, you would simply put your index finger (1) on the 5th string/2nd fret and your middle finger (2) on the 4th string/2nd fret. This is a chord called E minor (Em).
But wait!!! We need to know what strings to strum…
Strings are often omitted from a chord. Chord charts use a combination of X’s & O’s to tell us which strings to play or not (you always play the notes that you are fretting).
X=DON’T PLAY!!!
O=include this open string
Play the shape and strum all of the strings. Are we making music yet? If you are confused, reread the earlier sections of this article.
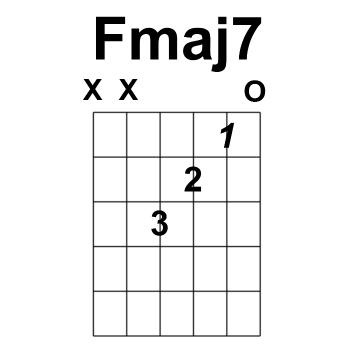
Let’s try a chord that omits 2 strings:
This chord (Fmaj7) can be made by putting your index on the 2nd string/1st fret, your middle on the 3rd string/2nd fret and your ring on the 4th string/3rd fret. Strum the 1st 4 strings.
REMEMBER NOT TO STRUM THE 5th & 6th STRINGS-THEY HAVE BEEN X’D OUT OF THE CHORD!!!
The orientation for chords and scale charts is the same:
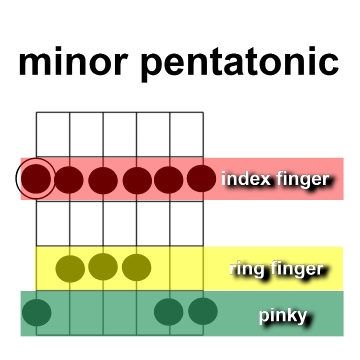
The main difference with scale charts is how they explain fingering. In scales, one finger plays several notes on different strings. You can usually find a logical pattern in a given shape to “assign” a given finger to a specific fret:
This diagram reminds us that the index plays ALL the notes on the 2nd fret,the ring plays ALL the notes on the 4th fret and the pinky is stuck with ALL the notes on the 5th fret. (Notice we don’t use our middle in this example. If we had notes to play on the 3rd fret, it would be logical to use our middle finger to play it.
*Get REALLY used to this four finger grouping-
we’ll refer back to it often!!!
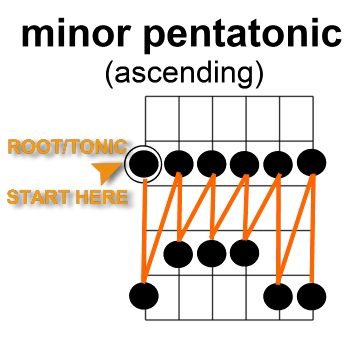
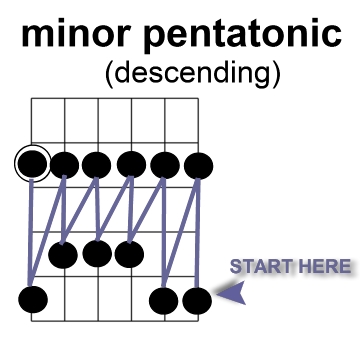
Now all we have to learn is the direction to play the scale.
If we want to play the scale ascending (Low to High), we would start on our root/tonic indicated by the circled dot. Now we continue up that string until we are out of notes. Now we move to the lowest note on the next string playing from Low to High. Continue this process until you are out of notes and/or strings…
Here is what it looks like in tab:
*To play the scale descending (going from High to Low), we would just reverse the order.
***Disclaimer-I apologize in advance to any and all LEFT-handed guitarists out there, but all my diagrams and videos are oriented for Right-handed players (players who use their right hands to pick). All of the information is still valid for lefties, but you will have to visualize a “mirror-image” for many of the graphics.
As a beginner, your fretting hand needs to perform the lion’s share of the work. The earlier you work on correct mechanics,the better. Don’t be overwhelmed by trying to remember all of these suggestions at once; concentrate on one or two points at first. After your hands “remember” these mechanics you can move on to others.
Making contact between the string and the fret is the key to producing a clean sound. If we make constant clean contact, the note will sustain as long as the string vibrates. If the pressure is removed, the note will die out. On a properly set up guitar, it shouldn’t take much finger pressure to make the connection. You should experiment to find the least amount of pressure it takes to produce a tone. Exerting too much pressure is fatiguing and could possibly pull the note out of tune on higher profile frets. Here are some helpful hints to perfect your fretting hand:
when fretting a note, get as close to the body side of the fret space as you can without physically touching the wire- touching the wire will mute the note.
keep your fingers straight with the fret wires- this will increase your stretch.
your palm doesn’t need to squeeze around the neck. Use only the fingers you need (with your thumb applying opposite pressure) to produce sounds. If you try to grip too close, you limit your stretch and cramp your hand.
don’t keep your elbow tucked into your torso- this pulls your hand out of position and hinders your ability to move up and down the neck fluidly.
Here are some easy exercises to help you with your technique:
EXAMPLE #1
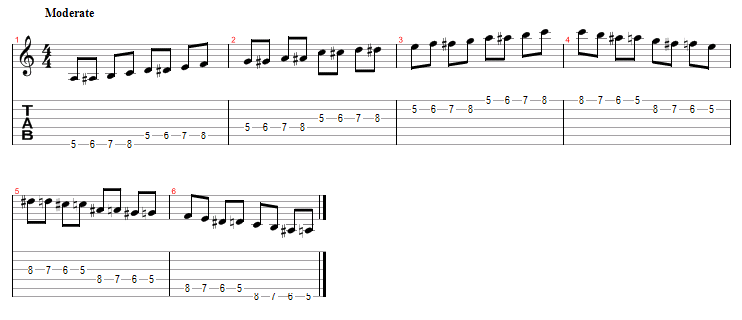
This first example uses all four fingers of your left hand to cover a 4 fret block. Each finger will cover one specific fret across the guitar. In this case, our index plays the 5th fret, middle plays 6th, ring plays 7th and pinky plays the 8th fret. Imagine yourself drumming your fingers on a desk (from index to pinky).
* Don’t be afraid to experiment with any and all exercises. Why not try playing EX.1 starting from a higher /lower fret while maintaining the same shape?
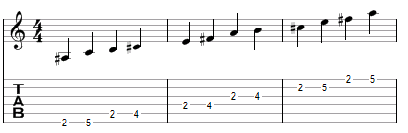
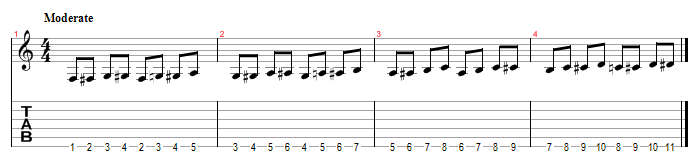
EXAMPLE #2
This exercise uses the Low E (6th) string exclusively, but you should also try it on the other five strings. You will still use one finger per fret like EX.1, but now our “four-finger block” will ascend up the neck- one fret at a time. (*NOTE that whenever you hear terms like “ascending”, “up” or “higher” it means that we are headed towards the body of the guitar).