Shawn David Anderson
About Shawn David Anderson
Posts by Shawn Anderson:
How to string a wrap-around bridge
The first thing we need to do is remove the old strings. Start off by loosening each string until it’s slack. Then simply cut off the strings. Remove the strings from the headstock. Remove the wrap around bridge. Take out each string.
Now is a good time to clean up your instrument- you can reach all those inaccessible spots the strings were covering.
If you have a rosewood fingerboard, you can also apply some “guitar-grade” lemon oil. Rosewood is a porous wood and it can start to dull and crack over time if left unchecked. A bit of Lemon oil will rehydrate it and help clean it. Just apply a generous amount on the fingerboard and let it seep in. Wipe off any excess.
Put on the new strings. Start with your Low E and make sure the strings are oriented correctly. Put the bridge back on so that it makes contact with the posts. Start with the Low E string and wrap it over the saddle (the position the string sits on) and pull it taut up to your Low E tuner.
Now measure 1 post up. Make a right angle bend, aiming in towards the key. This helps us measure the correct string length. Feed the string through to your bend and start tightening. You can use your fingers to guide the string into a descending coil around the post. Stop when you feel tension. Check to make sure you’re in the nut slot and on the saddle. *Remember, you can always loosen and reposition a string.
If everything looks good, you can go ahead and cut the excess off. Cut close to the post but MAKE SURE YOU DON’T CUT THE STRING ITSELF!!!
Let’s try the A string. Pull it taut to its tuner. Now measure 1 post up. Make a right angle bend, aiming in towards the key. Feed the string through to the bend and start tightening. Guide the string into a descending coil around the post. Cut the string close to the post.
When we come to the D string on a “3+3” type guitar (3 tuners per side of the headstock), we need to measure a little differently because we ran out of posts. Pull the string taut over its post. Now pinch it to mark its distance. Move your pinched “marker” to any other post and measure 1 post and make your right angle bend. Now just feed the string through to the bend and start tightening. Guide the string into a descending coil around the post.” Do the same for the G string. Finish putting on the rest of the strings.
It takes a little a little time for the strings to lose their elasticity, but we can help them along by stretching them. Fret notes from low to high on each string and give a tug every time you change position. If you do this after tuning a few times it will really help the strings break in faster.
Reading Tablature 1-1
Tablature is a kind of “musical shorthand” that has been around since the 14th century. All modern guitar players should make themselves familiar with reading it because it’s the easiest way to convey melodies and chords. To start reading tab, you’ll need to know the string and fret numbers.
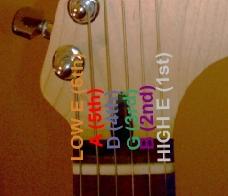
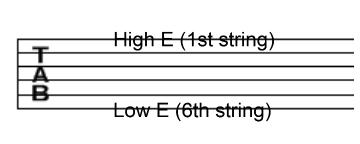
*Remember that your Low E is the thickest string- High E is the thinnest. The bigger the string number, the bigger the string…
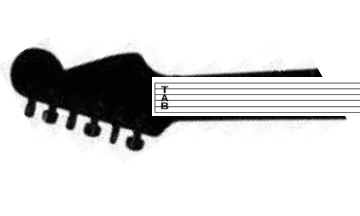
If the orientation is confusing, try laying your guitar down in your lap with the strings facing your chin.
TAB is as easy as reading a sentence from left to right. All we need to do is determine what string and fret to play.
FRET NUMBERS
Low E STRING (6th)
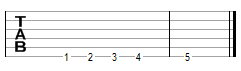
We already know how the strings are laid out- the numbers placed on the lines (strings) tell us what frets to play. In this simple example we start off playing the 6th string/1st fret, 6th string/2nd fret, 6th string/3rd fret, 6th string/4th fret and finally 6th string/5th fret.
Notice how all the fret numbers were on the same line (the 6th string). You can look at this example and immediately see that we are only using the Low E string.
*How would you annotate an open string? With a 0 (zero). Think of it as “playing no frets” on that string. Some of my students find it easier to think of the zero as the letter O as in Open string.
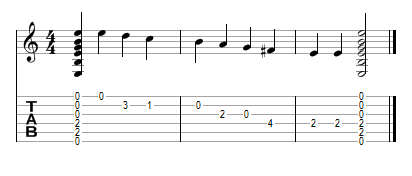
Let’s try reading another example incorporating open strings and the other five strings.

Start on your 6th string/Open, 6th string/3rd fret, 5th string/Open, 5th string/2nd fret, 4th string/Open, 4th string/2nd fret, 3rd string/Open, 3rd string/2nd fret, 2nd string/Open, 2nd string/3rd fret, 1st string/Open, 1st string/3rd fret.
Try to visualize TAB like you are connecting dots from left to right:

*Just remember that numbers will switch to different lines, BUT THEY ALWAYS READ LEFT TO RIGHT!!!

Can you write out chords with TAB? Sure, but just remember that the L-R movement is a reference for elapsed time. Single notes happen one at a time, but chords hit several notes at one time. To show that the notes occur simultaneously, they need to occur in the same “frame” in time. We notate this by stacking the numbers of the chord in a vertical line.

The example above has you playing a common Em chord at the beginning and end. Because the numbers of the chord are stacked upon each other, they occur simultaneously.

If you see a collective of numbers stacked vertically, you know that you will be playing several notes at once- but just think of that group as just one more number in the Left to Right progression.
TAB does have many benefits (easy to read & write, plenty of TABS available online, etc.), but it does have a few major drawbacks. For one thing, we have no idea how long any of these notes are held. Most melodies have certain notes held longer for emphasis. TAB alone has no way to express this. If I handed you TAB from a song you have never heard, it would be impossible for you to get it right rhythmically.
Standard notation (sheet music) shows us the duration of each note you play, along with the note itself. It is common practice in modern guitar books to have Standard guitar notation with TAB printed directly below. The note values are aligned vertically with their respective TAB numbers so that, with a basic study of note values, you should have a pretty good idea of how long to hold each note.